In this article we will take you through the steps necessary to install and set up any MK Lemur controller. Once you have completed the steps in this article, move on to the user guide for your product.
If you have not yet installed or are unfamiliar with Lemur, go back to Intro to Lemur. There you will be guided through the basics.
1. Download software from user account
The latest versions of our software are always available for download in your User Account.
2. Download and install MKConnect
MKConnect is MIDI Kinetics’ own macOS/Windows connection app. It manages additional communications for MK products such as communication with our DAW plugins and license key servers.
Visit the MKConnect product page for download links.
3. Activate license key
Each purchase of an MK Lemur controller includes 2 activations to run on 2 separate machines. Activate/deactivate a machine at any time to move activations to different machines.
- In MKConnect, open the Licence Key tab.
- Enter the license key you received with your purchase receipt. You will need an internet connection during the activation process.
If for some reason you need to reset your activations, contact us and we will gladly reset them. You may need to do this, for example, if you do a clean OS install without first deactivating the license.
4. Open the project in the Lemur Editor
If your project ships as a .jzml file, just double click it and it will open in the Lemur Editor.
If your project ships as a .jzlib file, right-click anywhere in the Project window and select import. You must create an interface first.

5. Transfer the project to the Lemur app
- Launch Lemur on your mobile device.
- In the Lemur Editor, click the Connections triangle at the top-right corner.
- Select your device from the list and click Connect. Your mobile device and your computer must be on the same mobile network.

6. Assign Lemur Targets
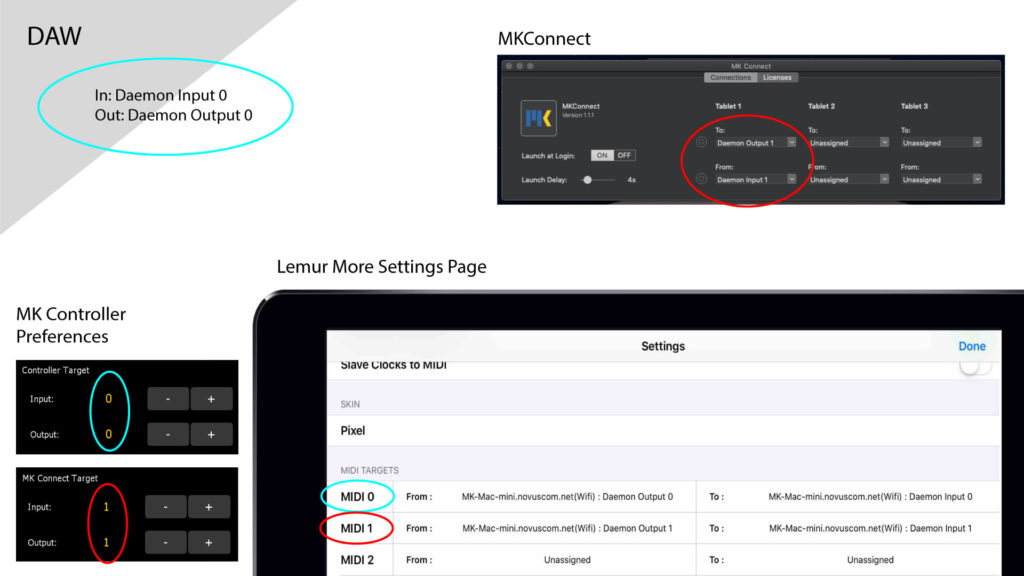
Every MK Lemur controller requires 2 Lemur Targets to manage 2 independent MIDI connections:
- 1 connection to your DAW
- 1 connection to MKConnect.
To change the Lemur Targets for your MK controller:
- Tap/Swipe the MK logo and go to Prefs/Connections.
New users can leave these at their default settings of 0 and 1. It only becomes necessary to change the Lemur Targets when combining controllers.
7. Connect MIDI to Targets
- Tap the cog-wheel icon at the top-right corner of the Lemur app and go to More Settings…
- Assign unique MIDI connections for each Target.
- Open MKConnect and assign the MIDI connection connected to the MKConnect Target.
- Open your DAW and assign the MIDI connections connected with the controller’s main Target. Every MK controller is specific to each DAW, so this step will vary. Consult the product manual for steps to integrate the controller with your DAW.
Example Routing for MK Boutique Lemur Controllers

Conclusion
You are now set up to use any MK Lemur controller! You can go straight to the controller manual and get started right away.
If you want to combine multiple controllers, see our article Combining MK Lemur Controllers.
